 English
 Nederlands
Authorisation management is an important part of information security. It's important that the right people have the right access to the right data and systems. An authorisation matrix is a handy tool for keeping track of this.
In this blog post, we explain what an authorisation matrix is and how to set one up. We also show an example of an authorisation matrix and give some tips for optimising your authorisation management.
The 10 steps for setting up an authorisation matrix:
- Preliminary inventarisation
- Inventarisation of user groups
- Determine access rights
- Group access rights
- Inventarisation of special permissions
- Setting up the authorisation matrix
- Review and approval of the authorisation matrix
- Apply the authorisations
- Periodic checks
- Reviews

What is an authorisation matrix?
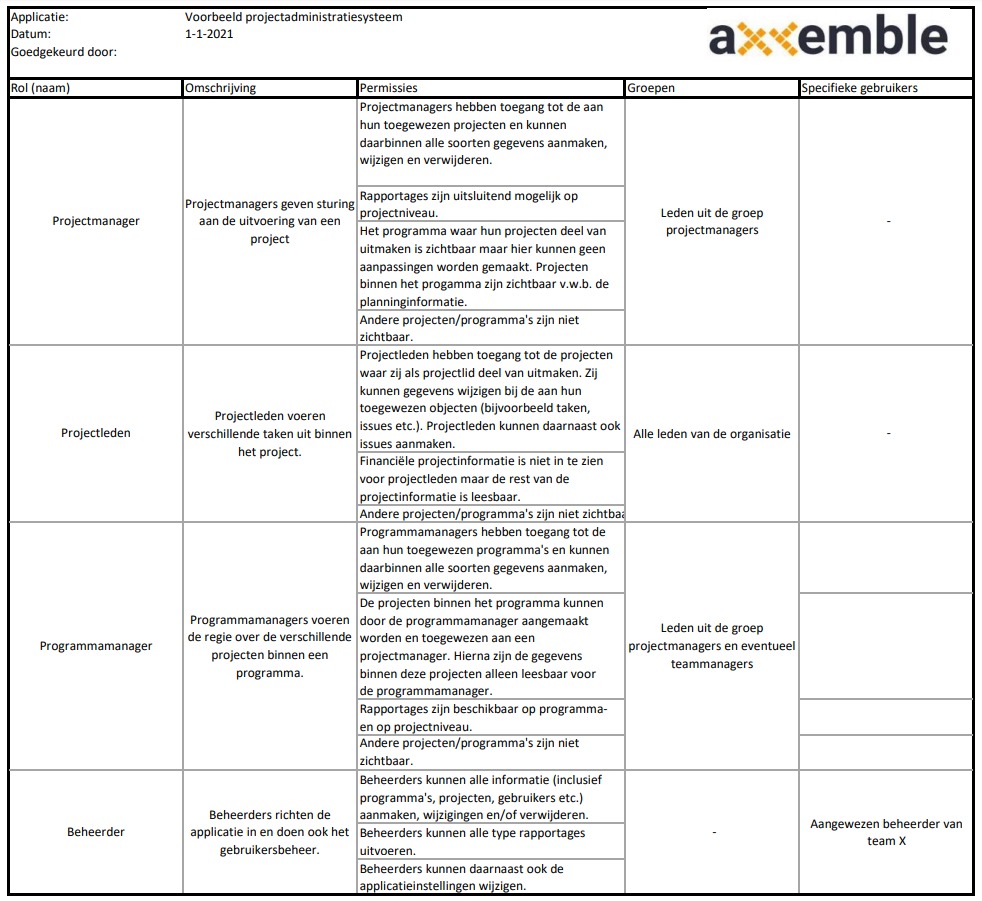
An authorisation matrix is a table showing users' access rights to various systems and data. The matrix makes it possible to quickly see which users should and shouldn't have certain access rights.
To keep the authorisations users are granted across different applications clear and organised, these are set out per application/system and per user role (or job function) in a matrix, or table, making it quick and clear which authorisations a user should have based on their role(s) within the various systems. This matrix is called the authorisation matrix and is used when granting, changing or revoking user's access rights.
Setting up an authorisation matrix can be a tricky task if you don't know where to start. Authorisation management covers much more than just access to certain software applications. Think, for example, of granting access to certain rooms or buildings, but also phones, laptops and tablets. All of these elements need to be included in an authorisation matrix.
Why authorise using an authorisation matrix
Any application that isn't freely accessible to everyone or to random individuals needs to verify the identity of the person, or user, wanting access to it. This is called authentication and usually takes place based on a username, password, special code and so on.
Within an application, different individuals (or users) often have different access rights, known as authorisations. These rights determine what a person can see and do within the application. When a person or user is assigned such rights, this is called "authorising".
An authorisation matrix in
10 steps
Setting up an authorisation matrix can be a time consuming process, but it's worth doing. Here are 10 steps you can follow.
1. Preliminary inventarisation
Before you can start on the authorisation matrix, it's important to know the current state of affairs within your organisation. Make an inventarisation of the current information systems and processes. Don't forget to also include physical spaces and equipment in this inventarisation.
2. Inventarisation of user groups
Make an inventarisation of the user groups per information system and process. These often correspond to organisational structures, such as different departments or specific job roles. Make sure you're clear on which user group manages which information system or process.
3. Determine access rights
Determine which access rights each user group needs. These rights can often be divided into:
- Read access to data;
- The ability to create data;
- The ability to modify data;
- The ability to delete data;
- Performing specific functions.
4. Group access rights
Now that you know which access rights each user group needs, you can group these rights into specific roles. In most applications these roles already exist and you simply need to link the correct access rights to the role. In other cases, you'll still need to create the role.
5. Inventarisation of special permissions
For each information system and process, identify which special permissions (rights) exist. These permissions are often related to administrator rights. An example of this is creating and/or modifying users. These permissions should be assigned to as small a group as possible, or to specific individuals only.
6. Setting up the authorisation matrix
Record all the information, user groups and roles you've identified in an authorisation matrix. For each rol, indicate which access rights and which groups should be linked to it.
Authorisation matrix example:
7. Review and approval of the authorisation matrix
Have the authorisation matrix checken and approved by the person responsible for each information system and process. Then update the matrix by incorporating the feedback received. This way, you can be sure you haven't overlooked anything.
8. Apply the authorisations
The approved authorisations naturally need to be applied. Often, the existing setup won't be in line with these. As a result, the necessary adjustments will need to be made within the organisation.
9. Periodic checks
Within authorisation management, things can change on a regular basis. It's therefore important to carry out periodic checks to see whether the authorisation matrix is still accurate. Here, you check whether the roles and authorisations applied are still in line with the authorisation matrix. The authorisation matrix is applied across the various systems. You also check whether any adjustments might be needed, and carry these out straight away. Carry out a periodic check at least once a year, preferably more often, for example every 3 months.
10. Reviews
Lastly, it's important to review the authorisation matrix itself from time to time. Here, you check whether the matrix (as a policy) still meets your needs and requirements. Once you've made any necessary adjustments, it needs to be approved and applied again (see steps 7 and 8). Such a review should be carried out at least once a year, for example just before the periodic check.
Tips for optimising your authorisation management
In addition to the 10 steps above, there are a few other things you can do to optimise your authorisation management:
-
Use an authorisation management tool. There are various authorisation management tools available that can help you manage your authorisations.
-
Automate where possible. Many tasks related to authorisation management can be automated.
-
Keep your documentation up to date. Make sure your documentation on your authorisations stays up to date.
-
Communicate with users. Make sure users know how to request and revoke authorisations.
-
Train users. Train users in how to use the authorisation matrix.
Improving your authorisation management
An authorisation matrix is an important tool for managing your authorisations. By setting up and maintaining an authorisation matrix, you can ensure that the right people have the right access to the right data and systems.
Even though the steps above will help you create and maintain a good authorisation matrix, the same issues around authorisation management tend to come up again and again. Many of these mistakes can easily be avoided.
Have you managed to create your authorisation matrix using the step by step plan? Or are you still running into problems? We're happy to help you with information security. Feel free to get in touch with us, we're here for you.



![Risk analysis for information security [with checklist]](https://www.base27.eu/hubfs/Imported_Blog_Media/checklist%20risicoanalyse.jpg "Risk analysis for information security [with checklist]")